Hardwood Plywood Quality Inspection
November 19, 2026
Common Defects, Acceptance Criteria and Pre-Shipment Checks for B2B Buyers
Introduction
For importers, distributors, furniture manufacturers and project procurement teams, approving a hardwood plywood sample is only the first step in quality control.
A sample may look excellent. However, bulk production can introduce variations in veneer appearance, panel thickness, core construction, bonding, sanding and packaging. If buyers miss these differences before shipment, they may face problems during production, installation or final delivery.
Therefore, a reliable inspection process checks the appearance and construction of finished panels. It also verifies that the shipment matches the approved specification, reference sample and agreed acceptance criteria.
This guide explains how B2B buyers can inspect decorative hardwood plywood before shipment and identify common defects. It also covers how to document nonconformities and make consistent acceptance decisions. Use the approved specification to distinguish acceptable natural wood variation from manufacturing defects and specification failures.
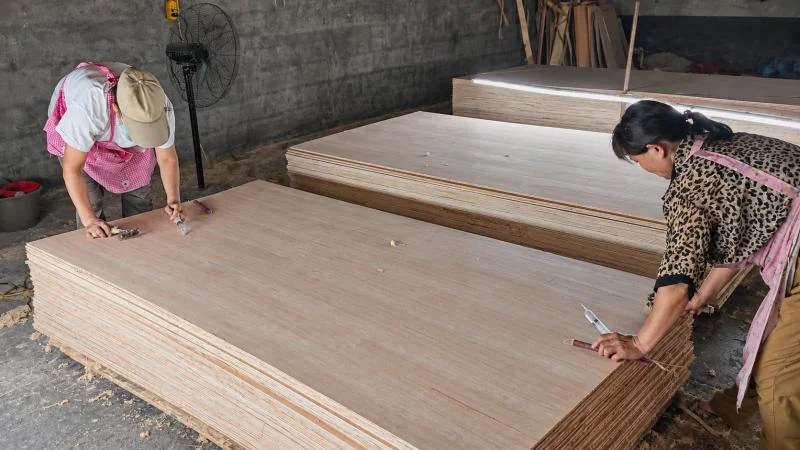
1 Establish the Inspection Standard Before Production
First, agree with the supplier on what makes a panel acceptable. Terms such as “A grade,” “good quality,” “smooth surface” or “consistent color” can mean different things to different people.
Before production begins, establish a written inspection specification covering the following areas. For help defining the product specification, see our decorative hardwood plywood buying guide.
1.1 Product identity and construction
First, confirm the exact product being inspected:
- Wood species and face veneer grade
- Face and back veneer requirements
- Veneer cut and matching method
- Core type and construction
- Nominal panel thickness and tolerance
- Panel length, width and dimensional tolerance
- Sanding condition and surface finish
- Adhesive, emissions and certification requirements, where applicable
For consistency, the inspection and production teams should use the same approved specification.
1.2 Approved reference sample
Next, use a signed or otherwise formally approved sample as a practical visual reference. For example, the sample should identify:
- Product code and order number
- Face species and grade
- Approved color and grain appearance
- Permitted natural characteristics and repairs
- Veneer matching expectations
- Surface finish and sanding condition
- Relevant construction details
However, natural wood can vary in color and grain across a batch. For larger projects, consider approving a representative range of acceptable appearances.
1.3 Inspection and acceptance criteria
Also, define the inspection method before production, including:
- The characteristics to check
- How to measure dimensions and thickness
- Acceptable, repairable and rejectable defects
- Whether to use visual, dimensional or laboratory inspection
- The sampling method and inspection level
- How to handle nonconforming panels
If the order requires statistical sampling, the parties may agree to use a recognized system such as ISO 2859-1. Then agree on the inspection level, sample size, AQL values and acceptance and rejection numbers for the order. Apply these sampling rules alongside the written product specification.
2 Inspect the Decorative Face for Surface Defects
Face quality directly affects the finished appearance of furniture, cabinetry and interior panels. Therefore, inspect panels under suitable lighting and at an agreed viewing distance and angle. Also, use the approved reference sample and specified hardwood plywood face grades to evaluate natural characteristics and repairs.
2.1 Color and grain inconsistency
Natural hardwood varies in color, grain direction and figure. Therefore, assess whether the finished face exceeds the agreed appearance range. For example, check for:
- Noticeable color differences between adjacent veneer components
- Unacceptable contrast between heartwood and sapwood
- Abrupt grain-direction changes
- Inconsistent appearance between panels intended for one project
- Visible mismatch against the approved reference sample
For large furniture or architectural projects, inspect several panels side by side. This helps you assess how they will look together after installation.
2.2 Veneer joint problems
Decorative face veneers often consist of several joined components. Therefore, inspect the joints for:
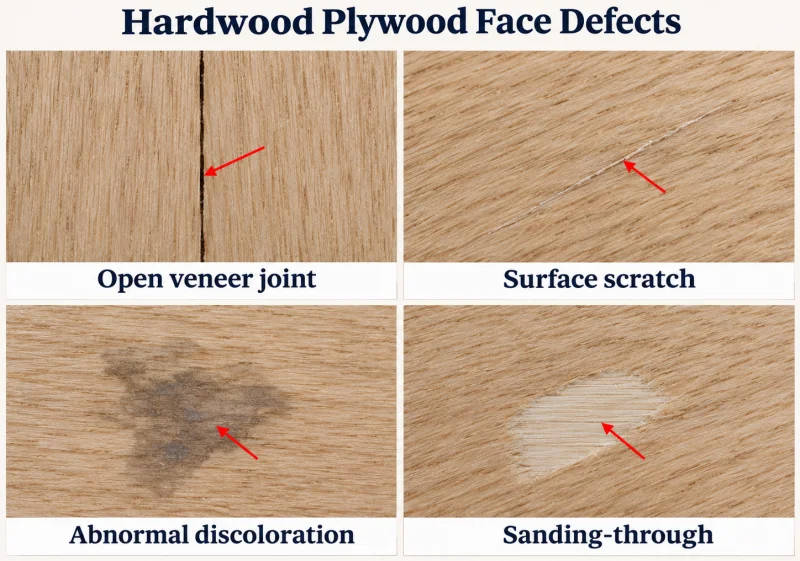
- Open or visible gaps along veneer joints
- Overlapping veneer components
- Uneven joint lines
- Poorly aligned grain at the splice
- Noticeable color differences between adjacent components
- Joint defects that become more visible after finishing
However, the acceptable appearance depends on the specified face grade and matching method.
2.3 Surface defects and repairs
In addition, inspect the face for:
- Knots and knot holes
- Splits and checks
- Mineral streaks and discoloration
- Patches and filled areas
- Scratches and dents
- Glue stains or other contamination
- Sanding marks and uneven surface preparation
However, the agreed grade may allow some natural characteristics and repairs. Therefore, check their size, number, location and appearance against the approved specification.
2.4 Sanding through and veneer damage
Sanding-through occurs when sanding removes too much face veneer. As a result, it exposes an underlying layer or causes an obvious surface defect.
With thin decorative veneers, these areas can be difficult to repair without affecting appearance. Therefore, inspect panel faces under adequate lighting. Pay particular attention to edges, corners and areas around repairs.
3 Inspect Panel Edges and Core Construction
A decorative face can conceal internal problems. Therefore, inspect exposed panel edges and selected cross-sections from the inspection sample where possible. For more detail, our guide to hardwood plywood core types explains veneer-core, MDF-core and particleboard-core constructions.
3.1 Core gaps and voids
For example, look for the following in veneer-core plywood:
- Visible gaps between internal veneer layers
- Large or repeated core voids
- Poorly fitted core components
- Uneven internal construction
- Localized weak areas around panel edges
Set acceptance criteria for internal irregularities based on panel construction, thickness, intended application and the agreed quality level. However, visual edge inspection may not be enough when internal voids are a critical concern. In that case, the buyer may require additional sampling or an agreed test method.
3.2 Layer alignment and panel construction
Next, check whether the panel construction matches the approved specification. In particular, look for:
- Uneven or displaced veneer layers
- Inconsistent core thickness
- Poorly finished edges
- Localized separation between layers
- Construction differences between panels in the same order
For MDF-core and particleboard-core panels, inspect the exposed substrate as well. Look for damage, swelling, crumbling or other conditions inconsistent with the approved product.
3.3 Edge damage
Edge and corner damage can occur during manufacturing, handling or packing. Therefore, check for:
- Crushed corners
- Chipped edges
- Broken veneer layers
- Impact marks
- Exposed or damaged core material
For minor edge damage, consider whether the affected area will remain visible. Also, assess whether it will interfere with cutting, edging or installation.
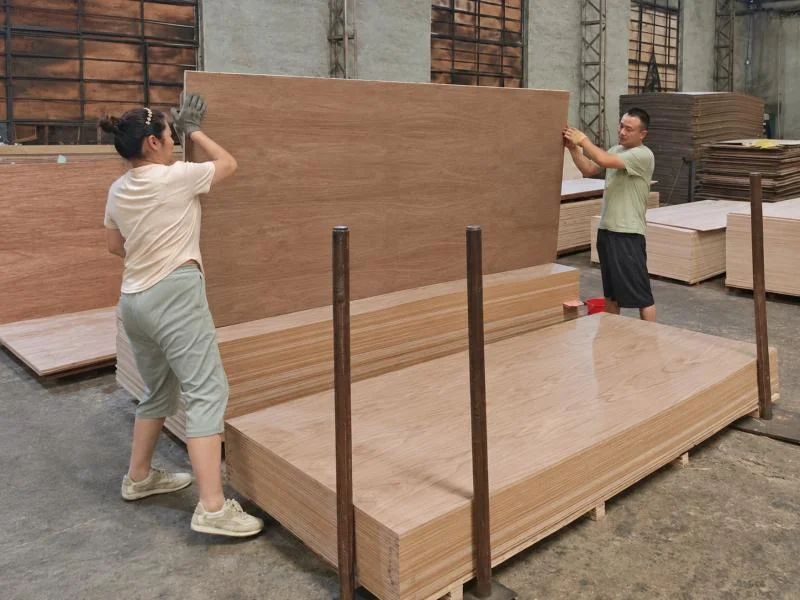
4 Check Bonding Quality and Delamination Risk
Even an attractive panel can contain a bonding problem.
4.1 Signs of delamination
Delamination is separation between bonded layers. For example, it may appear as:
- Visible separation along an edge
- Localized lifting or blistering
- Separation between veneer layers
- Bond failure that becomes apparent after cutting or machining
First, inspect the affected area to determine whether bonded layers have separated. In contrast, assess ordinary surface scratches, veneer cracks and finishing defects against their own criteria.
4.2 Visual inspection and bonding tests
During pre-shipment inspection, check for visible separation, blistering, lifting and abnormal edge conditions. If bond strength matters, specify a test method and acceptance requirements before production. Visual inspection can identify signs of separation. However, bond performance may require factory or laboratory testing, depending on the construction and intended use.
Also, link test results to the actual product, production batch and applicable specification.
4.3 Informal checks
Tapping a panel may identify areas worth investigating. However, use the agreed bonding test to evaluate performance. For demanding service conditions, confirm the required bond performance, exposure category and applicable technical standard before ordering.
5 Verify Panel Thickness Dimensions and Flatness
Dimensional inspection matters when automated machinery will process the panels. It also matters when panels must fit grooves, hardware or a fixed-size system.
5.1 Finished thickness
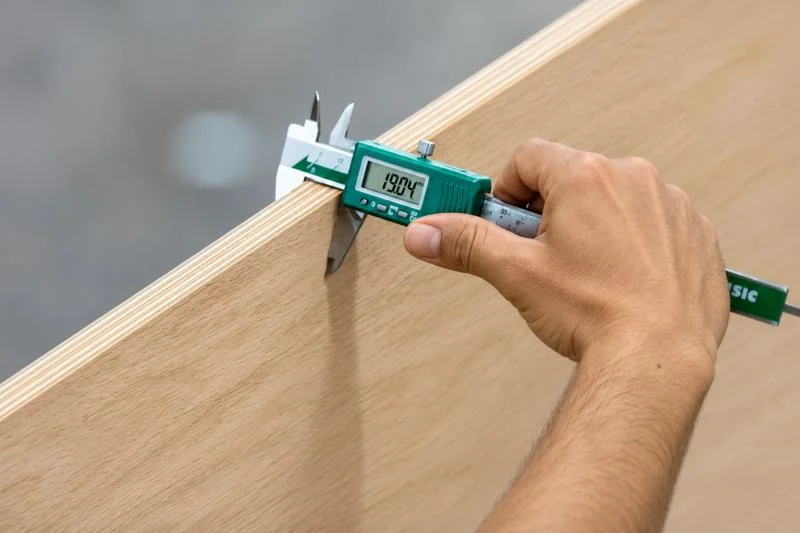
First, measure panel thickness with a suitable calibrated instrument. In particular, the inspection plan should specify:
- The target finished thickness
- Permitted positive and negative tolerance
- Instrument for measurement
- Measurement locations
- Whether the panel is measured before or after final sanding
Then take measurements at the agreed locations to identify variation across the panel.
5.2 Length and width
Next, measure the panels against the purchase order and check:
- Overall length and width
- Squareness
- Edge straightness
- Dimensional consistency between panels
Even small dimensional deviations can affect cutting yield and production efficiency when panels need further machining.
5.3 Flatness and warping
Finally, place the panel on an agreed flat reference surface or use an appropriate measuring method. Look for:
- Bow
- Cup
- Twist
- Uneven surface
- Localized distortion
Therefore, the acceptable flatness limit should reflect panel size, thickness, storage conditions and intended application.
6 Check Moisture Condition and Storage
Moisture condition can affect panel stability, machining and subsequent use. Therefore, define any moisture-content requirement in the product specification. Also, include the measurement method and acceptable range.
During inspection, also check for:
- Moisture readings outside the agreed range
- Signs of water exposure
- Swelling or edge expansion
- Surface staining associated with moisture
- Poor storage or handling conditions
Use a suitable instrument and interpret readings according to the panel construction and agreed procedure. If moisture variation is a concern, inspect multiple panels. Then record the measurement locations and results.
In addition, review how panels were stored before packing. Protect them from direct rain, ground moisture and unnecessary exposure to changing environmental conditions.
7 Classify Defects and Decide Whether to Accept the Lot
First, agree on defect classifications based on their impact on the intended application. The following categories help buyers and suppliers define their order criteria.
Critical defects
These conditions may create a serious safety, regulatory or contractual problem. For example, they may include:
- Incorrect product identity or construction that violates a critical requirement
- Missing or invalid mandatory compliance documentation
- Structural or bonding failures that compromise a safety-critical requirement
Therefore, define critical defects for the specific product and destination market.
Major defects
Major defects materially affect the panel’s intended use, appearance or manufacturing suitability. For example, they may include:
- Face quality clearly below the approved grade
- Significant open veneer joints
- Delamination that prevents normal processing or use
- Thickness or dimensions outside the agreed tolerance
- Warping that prevents normal processing or installation
- Core defects that materially affect required performance
Minor defects
By comparison, minor defects have limited impact on the intended application, subject to the agreed specification. For example, they may include:
- Small cosmetic marks in non-critical areas
- Minor edge imperfections that can be removed during normal cutting
Natural color variation within the approved range is acceptable. Therefore, consider a defect’s size, location, frequency, visibility and effect on the finished product when assigning severity.
When a defect is found
When you find a defect, record the following in the inspection report:
1. The product code and affected batch.
2. Defect category and description.
3. Number of affected panels.
4. Clear photographs showing the defect and its location.
5. The relevant specification or acceptance criterion.
6. Proposed corrective action.
Possible actions include rework, replacement, sorting, an agreed price adjustment or rejection of the affected goods. If the buyer grants conditional acceptance, document the affected quantity and agreed terms before container loading. In all cases, follow the purchase contract and the parties’ agreed procedure.
8 Build a Pre-Shipment Inspection Workflow
A consistent inspection process helps prevent last-minute disputes and provides a record of the shipment’s condition.
Stage 1 Before production
First, confirm the product specification, approved sample, inspection criteria and required documentation. Then resolve differences in how the buyer and supplier interpret face grade, thickness tolerance or packaging requirements.
Stage 2 During production
For repeat orders or large projects, consider checking:
- Veneer selection and face assembly
- Core construction
- Pressing and bonding process records
- Sanding and finishing condition
- Early production panels against the approved sample
As a result, early checks can identify process problems while there is still time to correct them.
Stage 3 Finished goods inspection
Next, inspect finished panels using the agreed sampling plan. For example, follow this practical sequence:
1. Verify product identity and quantity.
2. Check packaging condition before opening.
3. Select panels according to the agreed sampling plan.
4. Inspect face and back appearance.
5. Check edges and visible core construction.
6. Measure thickness and panel dimensions.
7. Check flatness and moisture condition where specified.
8. Record defects and supporting photographs.
9. Compare results with the agreed acceptance criteria.
Stage 4 Before container loading
Before loading, match the goods prepared for shipment to the inspected lot. Then check:
- Accepted quantity and product mix
- Package labels and identification
- Protective materials and edge protection
- Pallet condition and stability
- Loading arrangement
- Container condition
- Loading photographs and shipment records
Also, keep accepted goods identifiable during staging and loading. This prevents mix-ups with uninspected stock.

9 What to Include in an Inspection Report
An inspection report should show the buyer, supplier and any third-party inspector exactly what the team checked and found.
| Report section | Information to record |
| Order information | Purchase order, buyer, supplier and inspection date |
| Product identification | Species, grade, core, thickness and dimensions |
| Inspection scope | Visual, dimensional, moisture, bonding or other agreed checks |
| Sampling information | Lot size, sample size and agreed sampling method |
| Measurement results | Actual readings and permitted tolerances |
| Defect records | Defect type, quantity, location and severity |
| Photographic evidence | Overall panel view and close-ups of defects |
| Documentation | Relevant test reports and certificates, where required |
| Final result | Pass, fail or conditional acceptance under the agreed criteria |
| Corrective action | Sorting, rework, replacement or other agreed remedy |
Photograph the whole panel and take a close-up of the issue. Also, include a scale or measuring tool where size matters.
However, keep findings from the inspected sample separate from the lot decision under the agreed sampling plan.
10 Hardwood Plywood Inspection Checklist
Use this checklist as a starting point. However, apply the acceptance criteria agreed for the order.
Product and specification
- Product species, grade and construction match the purchase order.
- Face and back requirements match the approved sample.
- Core type and panel thickness are correct.
- Dimensions and tolerances are clearly defined.
Surface and appearance
- Color and grain variation are within the approved range.
- Veneer joints meet the agreed appearance requirements.
- Splits, open joints and sanding-through meet the agreed acceptance criteria.
- Repairs and natural characteristics comply with the specified grade.
- Surface finish is consistent with the order.
Core and bonding
- Core gaps and construction meet the agreed acceptance criteria.
- Panels show no visible delamination or layer separation.
- Required bonding test records are available, where specified.
- Edges and corners are in acceptable condition.
Dimensions and condition
- Thickness readings meet the agreed tolerance.
- Length and width meet the specified dimensions.
- Flatness meets the agreed requirement.
- Moisture condition meets the specified requirement, where applicable.
Packaging and shipment
- Packaging protects panel faces and edges.
- Pallets and strapping are suitable for transport.
- Labels and package quantities are correct.
- Container condition and loading arrangement are acceptable.
- Inspection records and shipment photographs are retained.
Conclusion
First, define acceptance criteria before production and use them from sample approval through container loading. Then check appearance, core construction, bonding and dimensions using the agreed methods. Also, document any nonconformities and resolve corrective actions before shipment. Finally, verify that the accepted goods are packed and loaded.
For decorative hardwood plywood, an agreed appearance range helps both parties judge natural wood variation alongside the order’s technical requirements.
Discuss Your Hardwood Plywood Specifications with Voyage
Voyage supplies decorative hardwood plywood for distributors, furniture manufacturers, cabinet producers and project buyers.
For a new order, share your required species, face grade, veneer cut and matching method. Also, include the core construction, thickness, dimensions, intended application and destination market. Our team can review the specification. Together, we can clarify what to confirm before sample approval, production and shipment.
Explore our hardwood plywood sheets or email Voyage to discuss your next order.